Showing posts with label headband. Show all posts

The Art of Racing in the Rain

This book was not what I expected, so I'm glad I read it before I bound it! For some reason I expected it to be about a dog who loves chasing things—you know, good old-fashioned foot-racing.

In fact, this turned out to be a charming, meaningful, and reflective book, written from a dog's perspective, with the rare power to hold my attention while talking about car races. It was reminiscent of the classic Zen and the Art of Motorcycle Maintenance, and certainly a worthy evening's read.
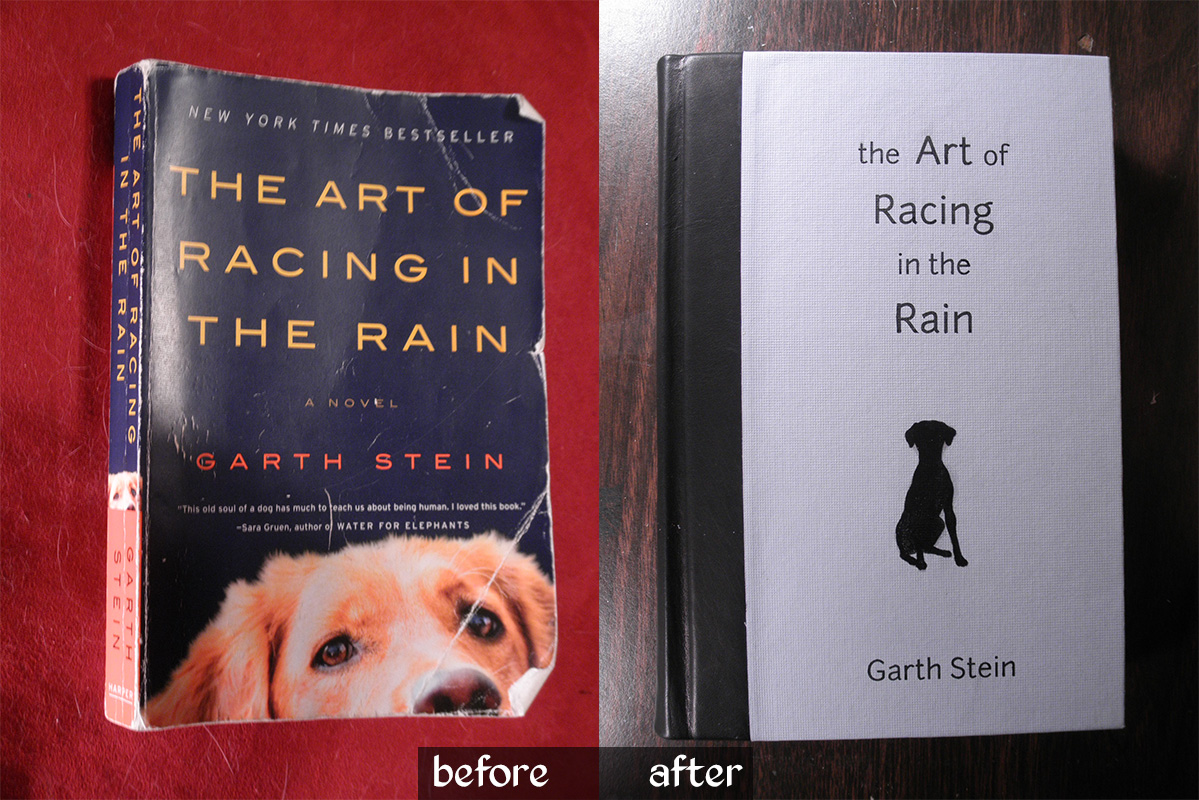
With three themes of its content in mind—dog as armchair philosopher, car races, and rain both real and metaphorical—I set about designing its new look. Enzo the dog takes the main focus, as on the standard cover, this time as a silhouette but with remarkably similar ears. The racing theme found its way onto the endpapers in the form of flying checkers, and a pale blue cover paper sets the rainy theme. For just a touch of class, I used black leather on the spine.


Oh, and I really love adding hand-stitched headbands to books.


I was a little crunched for time on this; my brother wanted it as a birthday present for a friend.  Were I to try again with more time, I'd add some silver detail on the cover—or maybe orange?  I do love blue and orange, and it would maintain more of the original look.

I'm also not entirely happy with the typesetting of the title. Normally I would spend hours obsessing over that!  I might have tried making the dog silhouette full bleed on the left, right against the black leather shoulders, with the title set more to the right... oh well.  It's done now, and all concerned parties have communicated their satisfaction.

Two things that went quite well this time were the spine and the insides of the covers.  I finally realized that I need to crease the shoulders so that the spine is much wider than the text block.  This gives the French grooves more definition, allows the book to open without wrinkling the leather, and gives me wiggle room so that the spine doesn't end up narrower than the rest of the book (a BAD problem).  As for the insides of the covers—by which I mean the cover material which wraps around to the inside—I achieved a very clean, even, square edge on both the paper and leather portions this time around.  Weirdly uneven lumps under the endpapers are not cool!

Family Bible, part III: finished

Today I put the finishing touches on my commissioned re-binding of a paperback CCD Bible. I am extremely pleased with the results and I hope my client will be as well!

The plan was to use red Italian (Cialux) book cloth to cover the cover boards. While I love the look of this fabric, I was at first not entirely sure how I'd put a title on it—I don't have the tools or skills to gild it or screen print it, and the laser printer I used on the paper-covered Plato books would probably not work so well on cloth. However, I remembered back to Brian's Tome and decided the best thing to do would be an embossed look.

I was able to achieve this by cutting the letters out of a sheet of cardstock and pasting it over the front coverboard. The effect is subtle, but combined with the very bold lettering (traced directly from the original cover), it shows up well and has quite an impact. Unfortunately my camera is no good at capturing it—you need to hold it in your hands to really enjoy the effect.

As I mentioned in the previous post, I felt that this book would be incomplete without headbands. By an odd little bit of irony, I'm too lazy to get hold of machine-made headbands, so I defaulted to the more work-intensive task of handmade headbands.

These are stitched directly onto the text block, with the tie-downs passing between pages and through the kraft paper backing rather than through signatures. I used top-sewing upholstery thread over a core of whipping twine, and followed this excellent tutorial.

The book has a very nice profile when lying open. I think this may be the cleanest execution of covering and endpaper paste-down that I've managed so far.

Finally, my client had asked for me to incorporate the inside of the original front cover, if possible, because it had the family name written in it. So here is a shot of the old cover snuggled onto the inside of the new front cover—though I blurred the name for privacy.

The Tome, part III: Structure

Chairete! (That's Attic Greek for "Hello, everyone!) How about a view of the top of my head while I'm working?

I've been making progress on the journal. I've gotten the spine stitched, glued, rounded, and backed. I've stitched in headbands -- making them myself was easier than trying to find a place nearby that sells them pre-made. Here's a picture of the book with all these things accomplished, except the rounding and backing:

Sewing thread isn't quite thick enough for a headband, which needs more of a heavy floss to look good, but that was all I had. Rather than go out and buy something thicker, I decided to make a project of twisting the thread I had, four-ply, into a thicker strand. This would have been absolutely pointless if it weren't an excuse to use Grandpa Parker's hand-drill, but it was, so as a matter of fact it was a complete win.

With the spine all set, I cut cover boards and laced them onto the cords. May I now present to you... structure!

From the inside, the book looks pretty nearly finished -- it just needs a cover on the spine.

The next step is to find leather and start covering the...covers. Cover boards. Decorating them. There.

That means the prettiest pictures are yet to come, so stay tuned for part IV!

Go to: Part II | Part IV